OAuth2 Client Authorization
On FusionFabric.cloud the authorization process is orchestrated by the FusionCreator Authorization Server through one of the following OAuth2 flows: Client Credentials Grant flow and Authorization Code Grant flow. These flows are detailed in RFC 6749, section 4.
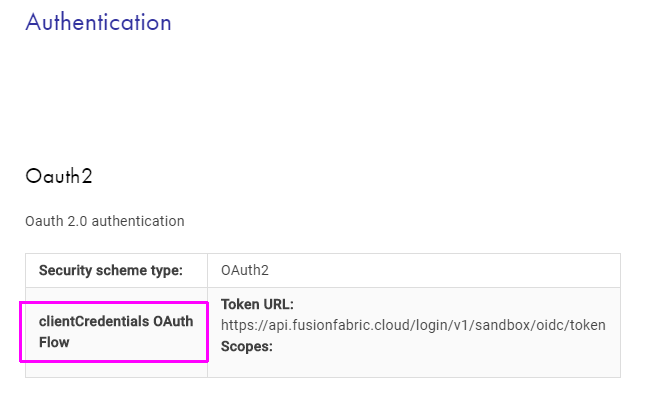
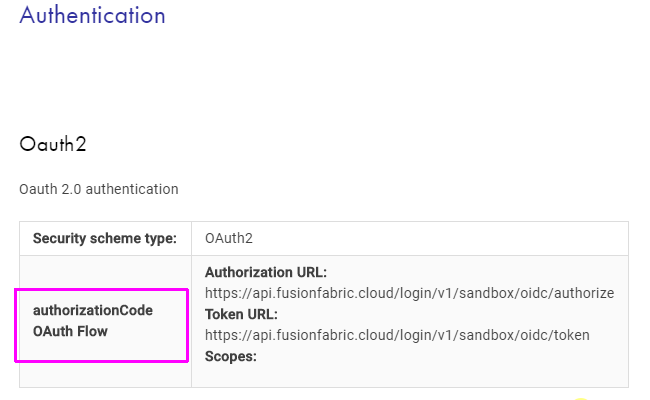
The grant flow supported by an API is stored in the OpenAPI Specification, in the securityDefinitions.Oauth2.flow field as follows:
application, for the Client Credentials grant flowaccessCode, for the Authorization Code grant flow
The supported authorization grant flow is displayed in the API reference documentation, in the Authentication section.
 |
 |
OIDC Discovery Service
On FusionCreator, the Authorization Server implements OIDC as the identity layer. Thus, it supports OpenID Connect Discovery 1.0 to expose the configuration information at URLs that are different for each tenant.
The following table summarizes the Discovery service URLs:
| Tenant | Discovery Service URL |
|---|---|
| Sandbox | url |
| Other Tenants | url |
To learn more about the response of the Discovery service endpoint, see OpenID Provider Metadata section of the OIDC Discovery specification.
Client Credentials Grant Flow
The OAuth2 Client Credentials Grant flow is shown below.
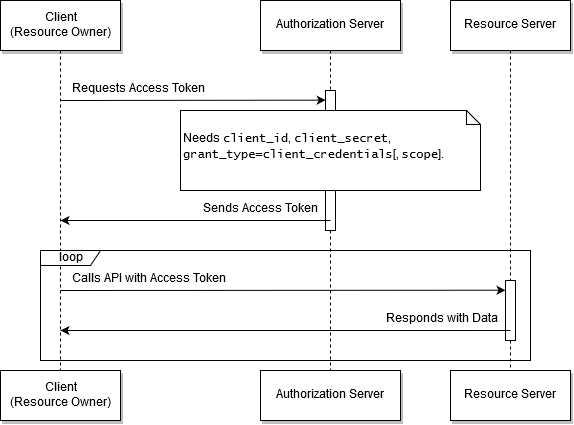
The OAuth2 Client Credentials Grant flow.
In the Client Credentials Grant flow, your client interacts with the resource server, without the human intervention.
The credentials - the client ID and the secret value, are used as the authorization grant that is passed to the Authorization Server in exchange for the access token.
This flow is aimed at machine-to-machine communication, where the end-user is not the resource owner.
To find out more about the Client Credentials Grant, see RFC6749 - section 1.3.4, and section 4.4.
Authorization Code Grant Flow
The OAuth2 Authorization Code Grant flow is depicted in the following diagram.
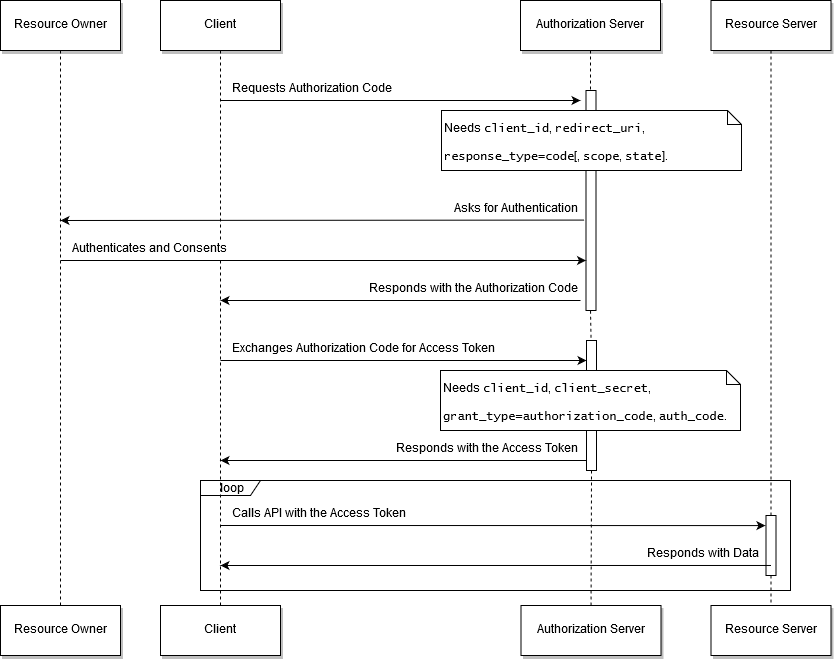
The OAuth2 Autorization Code Grant flow.
The Authorization Code grant flow is used by the client apps that require human interaction for authentication. In this case, the resource owner is a person, referred to as the end-user, by RFC6749. The end-user is redirected to the Authorization Server where he must log into. The Authorization Server sends back the authorization code and redirects the client to the reply URL. Therefore, the reply URL must be in the full control of the client application and implement the logic to process the authorization code and exchange it for the access token.
To find out more about the Authorization Code Grant, see RFC6749 - section 1.3.1, and section 4.1.
Private Key Authentication
On FusionCreator, the Authorization Server implements OIDC as the identity layer and provides you with standard authentication methods, as described in the previous sections. These methods are client_secret_post and client_secret_basic, and are described in OpenID Connect Core 1.0, section 9.
In addition to the standard authentication methods, the Authorization Server supports the private_key_jwt method, which is a stronger authentication method based on asymmetric cryptography.
This method allows you to code your client application to request the access token with a JSON Web Token (JWT) that you sign with a private key. To make it work, you upload the corresponding public key as a JSON Web Key (JWK) in your dashboard, as described in JSON Web Key. When you request for the access token, your identity is verified by checking your JWT signature with the public key.
The signed JWT must contain all the required claims, as mentioned by the OIDC Core specification - iss, sub, aud, jti, and exp. The claims are documented in the section 9 of the specification.
The OAuth2 Client Credentials Grant flow, enhanced with private key authentication, is shown below.
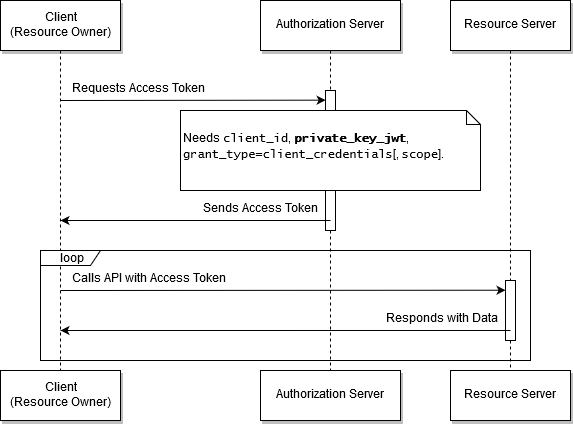
The OAuth2 Client Credentials Grant flow enhanced with private key authentication.
The OAuth2 Authorization Code Grant flow, enhances with private key authentication, is shown in the following diagram.
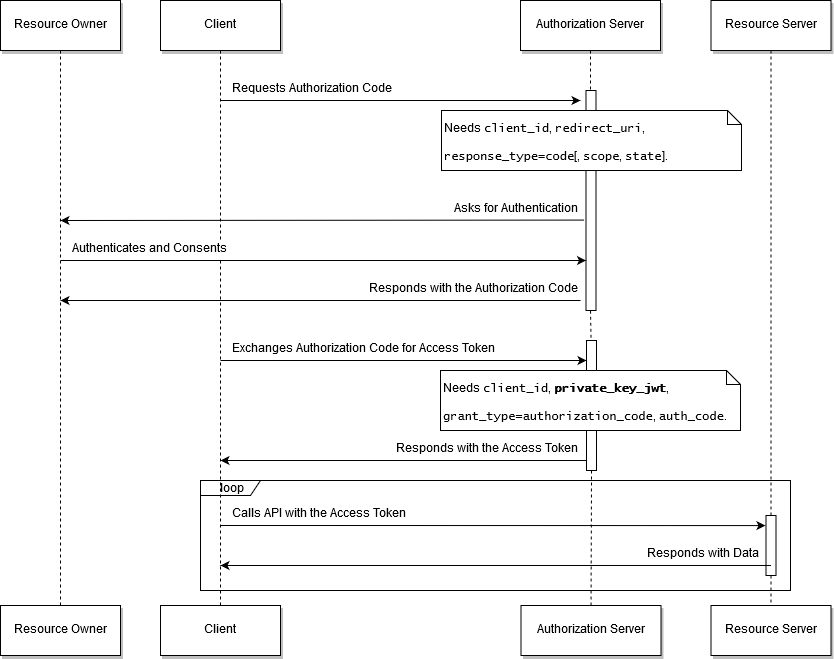
The OAuth2 Authorization Code Grant flow enhanced with private key authentication.
To enable private key authentication in your applications
- Generate a pair of private-public keys, with your tool of choice. For example, OpenSSL provides you with the following CLI commands:
- To generate a private RSA key stored in a local file, named private.key
openssl genrsa -out private.key 2048- To export the public RSA key to a local file, named public.key
openssl rsa -in private.key -pubout -out public.key- Convert your public key from PEM to JWK format. You can use an online tool, such as JWK Creator.
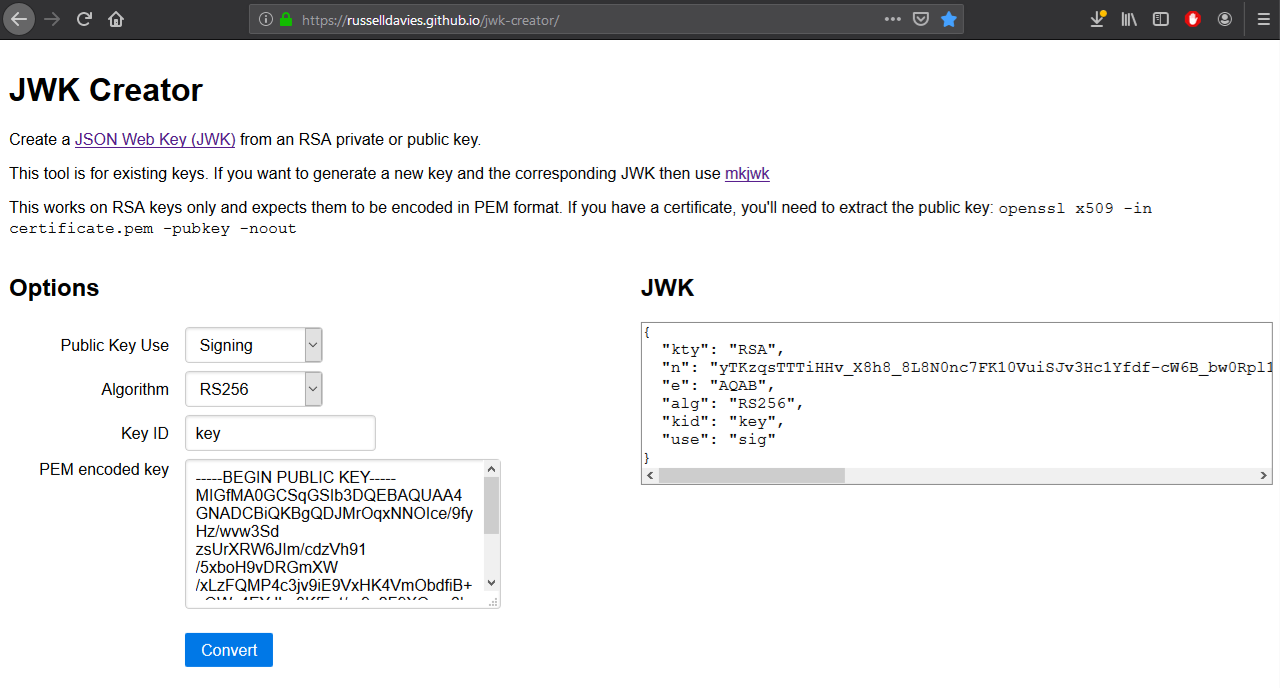
Create a JWK from the public RSA key.
- Store the JSON Web Key in a text file, with the following structure:
{
  "kty": "RSA",
  "n": "",
  "e": "",
  "alg": "RS256",
  "kid": "key",
  "use": "sig"
}- The
nandemembers are computed from the public RSA key that you previously created. They are the modulus and the public exponent of the key, encoded as Base64 URL strings. - The
kidis the key ID. This ID enables the server to know which public key to use to validate the signature of the JWT that you use with your client application to request the access token, as described earlier. - The
ktyis the key type,useis the key usage andalgis the algorithm used to validate the signature of the JWT. - If you used the online JWK creator in the previous step, copy the JWK to an empty text file. You can use the key ID to name the file, such as key.jwk.
- Upload the JSON Web Key file to your application, as described in the JSON Web Key section of Application Details.