PowerApps Client App Tutorial
The purpose of this tutorial is to show you how to create a Microsoft PowerApps client application that will call Finastra APIs.
In this tutorial you are going to build a bank’s consumer client application, that would let your users see the list and details of their accounts, make internal transfers and access their profile information.
This step-by-step tutorial will show you how to create all the components of the client application. If you are already familiar with PowerApps, go ahead to Import and Export your Client Application to import it to your environment.
If you prefer watching a video instead, a recording closely following this tutorial is available at Leveraging FusionFabric.cloud APIs with Microsoft PowerApps.
Prerequisites
To build this client application you need to register an application on FusionCreator and add the following APIs:
You also need access to Microsoft PowerApps and your account should be enabled to use custom connectors.
Applications in PowerApps can only be used in the context of an organization. To find out more about the onboarding process, read this PowerApps documentation section.
You will implement the OAuth2 Authorization Code grant flow, that is supported by Microsoft PowerApps.
PowerApps Custom Connectors
In PowerApps you can define custom connectors that you will use to connect to Finastra APIs. You will define three custom connectors, one for each API registered in your application.
To understand how connectors work, check out Custom Connectors.
To create custom connectors from the OpenAPI specification files
- Download the OpenAPI Specification (OAS) of each API that you registered in the previous section, and use it to create three custom connectors.
To learn how to define custom connectors using an OAS, check out the PowerApps documentation.
- Run through the connector wizard with the following settings:
- Name: name the connectors according the each API
- Accounts
- InternalTransfers
- ConsumerProfile
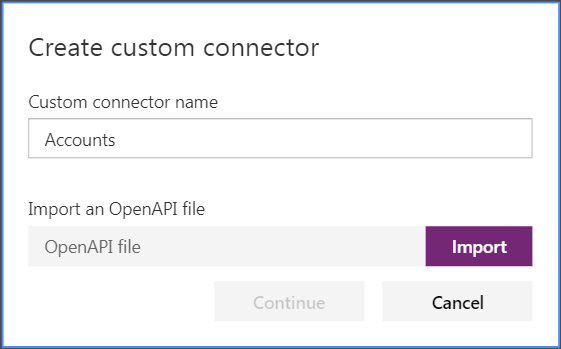
Name and URL
General: Do not modify the Scheme, Host and Base URL.
Security:
- Use the Client ID and Secret Key of the app that you registered in FusionCreator.
- Refresh URL: enter the Token URL of the Discovery service.
- Scope: enter
openid.
Definition:
- The endpoints included in the OpenAPI specification are displayed. Click Create Connector to finalize the creation process.
The allOf option from the OAS 2.0 definition is currently not supported in PowerApps, to retrieve all the schemas you need to replace it with the definitions. See the example below.
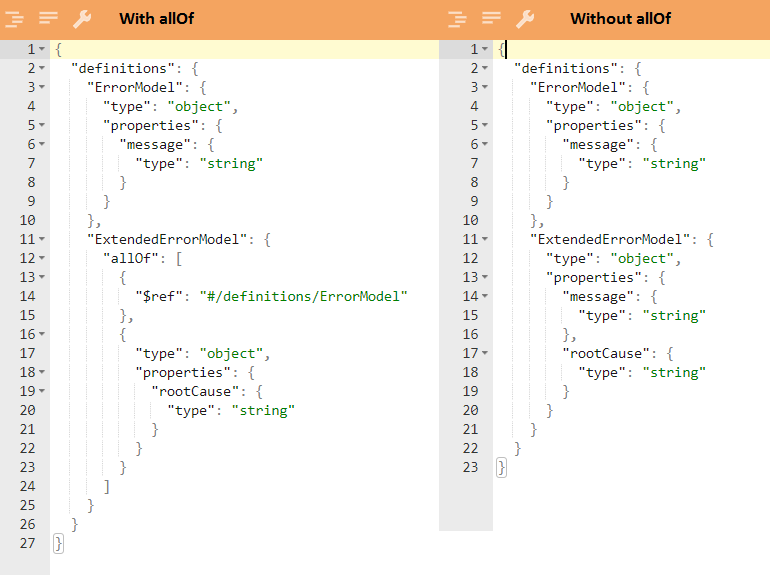
The allOf option.
To improve the security, go back to the Security step, copy the Redirect URL that has been added and paste it in the Reply URL of your application to restrict the redirection.
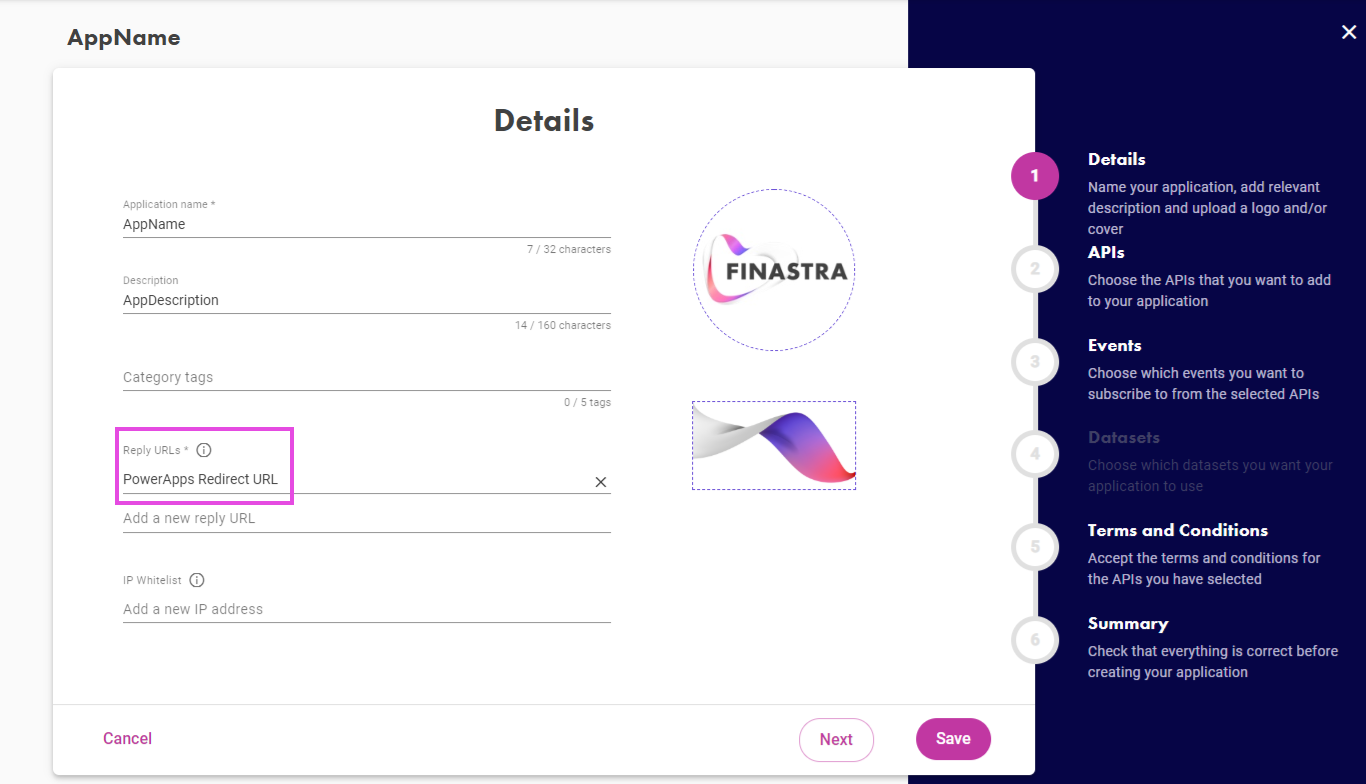
Update the Redirect URL with the one generated by the PowerApp client application.
Use one of the following credential pairs to log into Finastra Sandbox tenant:
| User | Password |
|---|---|
ffdcuser1 |
123456 |
ffdcuser2 |
123456 |
After your connection is established, test the endpoints included in your connector.
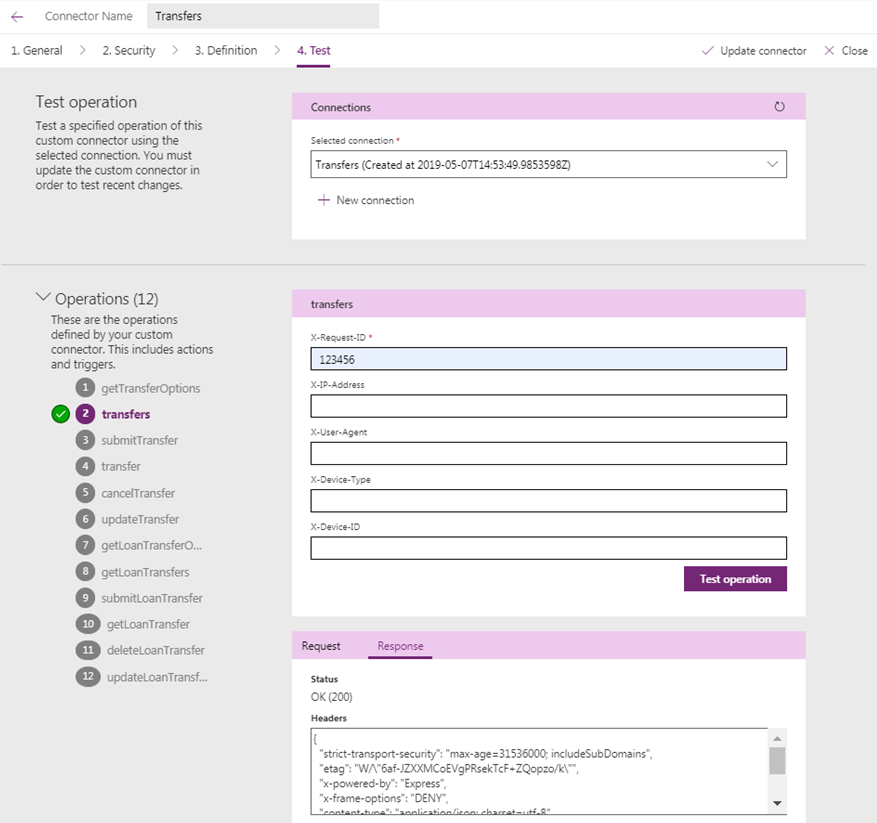
Test connection
Your connectors are configured and you are now ready to build your client application.
Build your Client Application
You will use PowerApps Studio to build your client application.
To build your client application
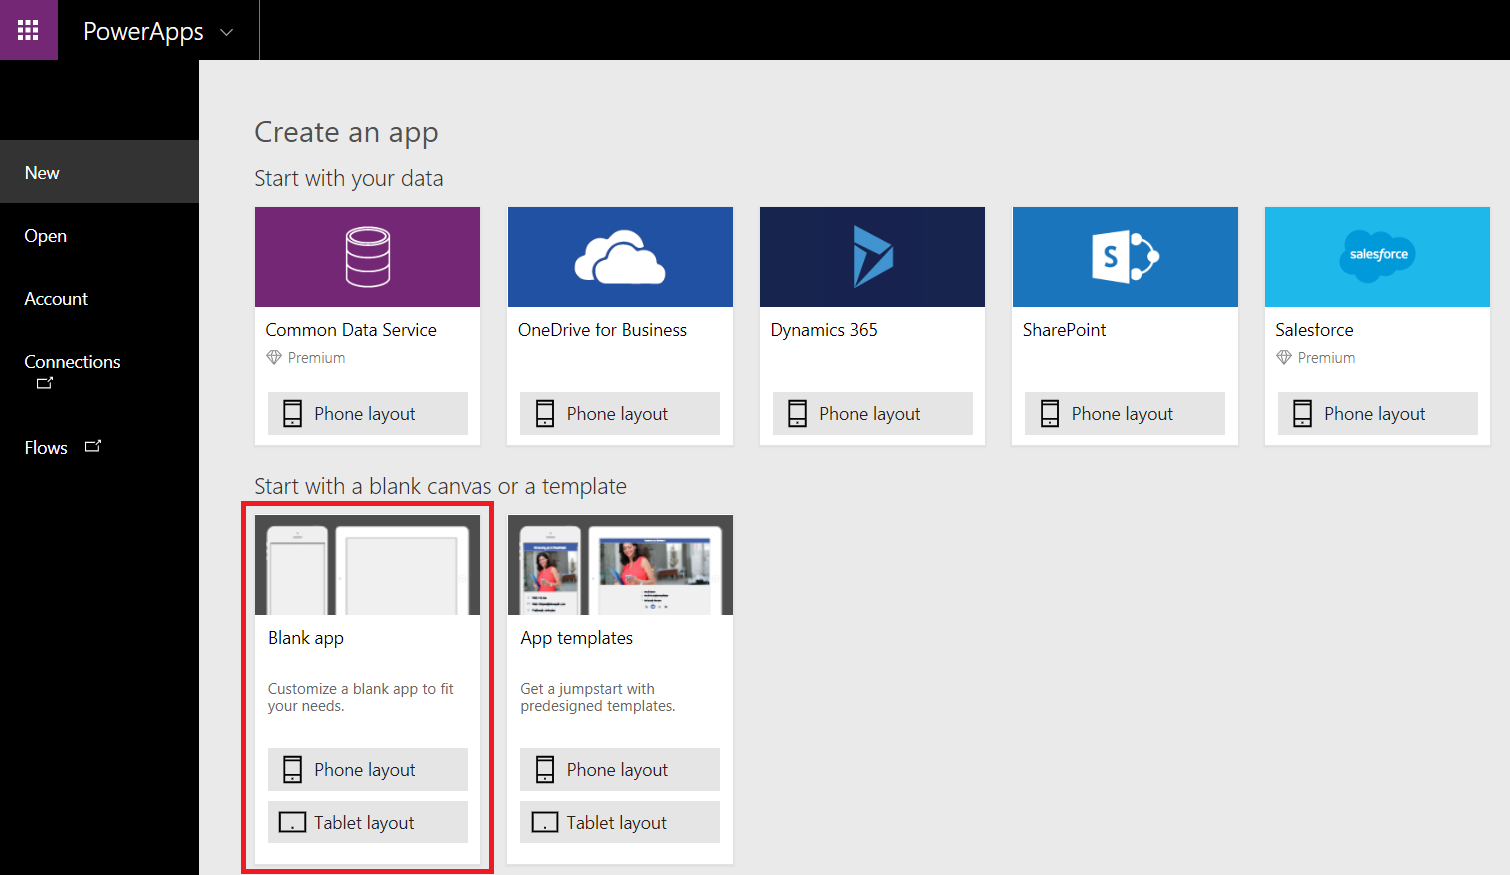
- Go to PowerApps Studio, and click Create an app. You are redirected to the app creation wizard.
- Select the Blank app with the Phone Layout. A canvas opens where you can visually add the elements to your client application.
Boostrap a PowerApps App
- In the canvas, go to View and select Data sources.
- Add the three connections previously created.
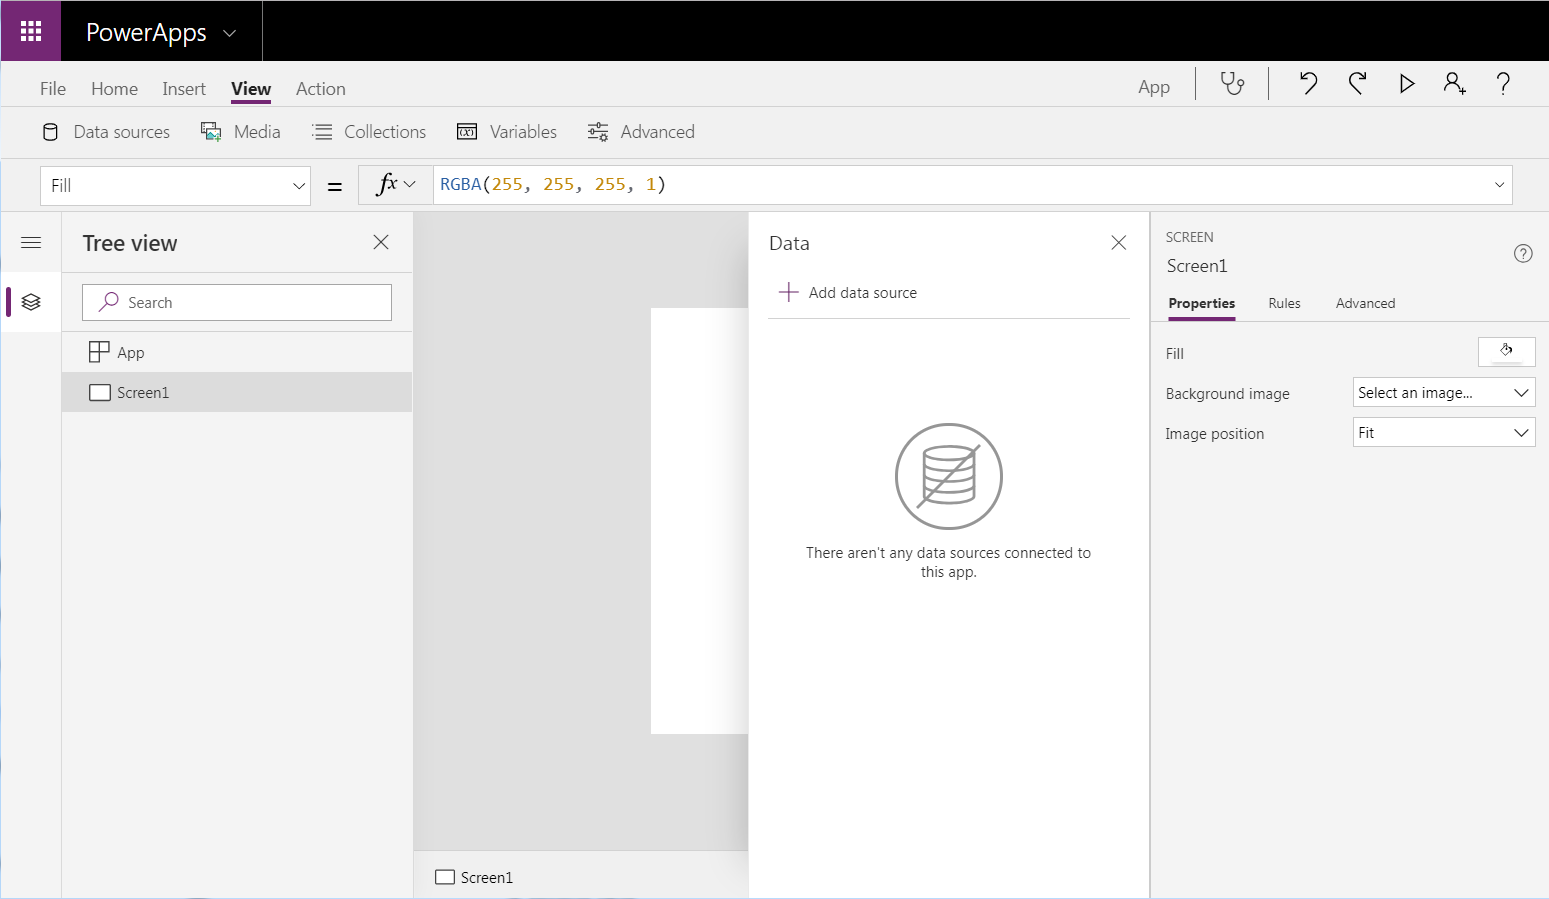
Select the data sources for your client application.
- Go to Media and upload the images that you will use in the application. You can upload your own images or use the following samples:
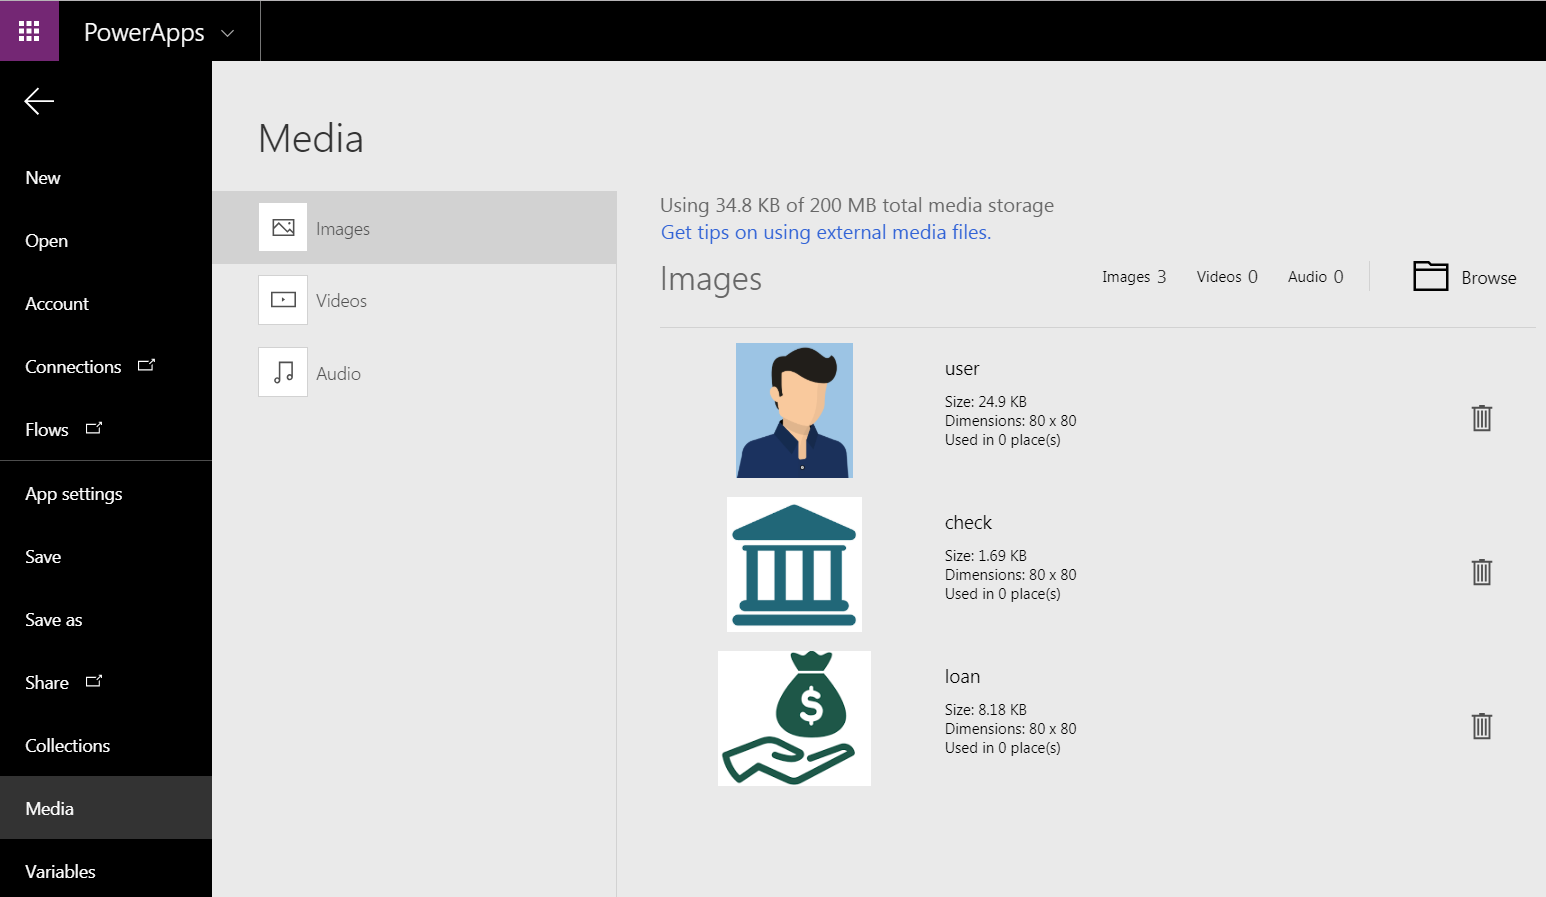
Upload your images.
Application Screens
You are now ready to add your client application screens.
Your client application will contain five navigation screens, detailed in the following sections:
Turn on the Auto save option from your Account settings.
Home Screen
In the following sections, the formula separator character - the comma
,- may be different based on your regional and language settings. Find out more on the PowerApps Documentation, and update the formulas accordingly.
Home
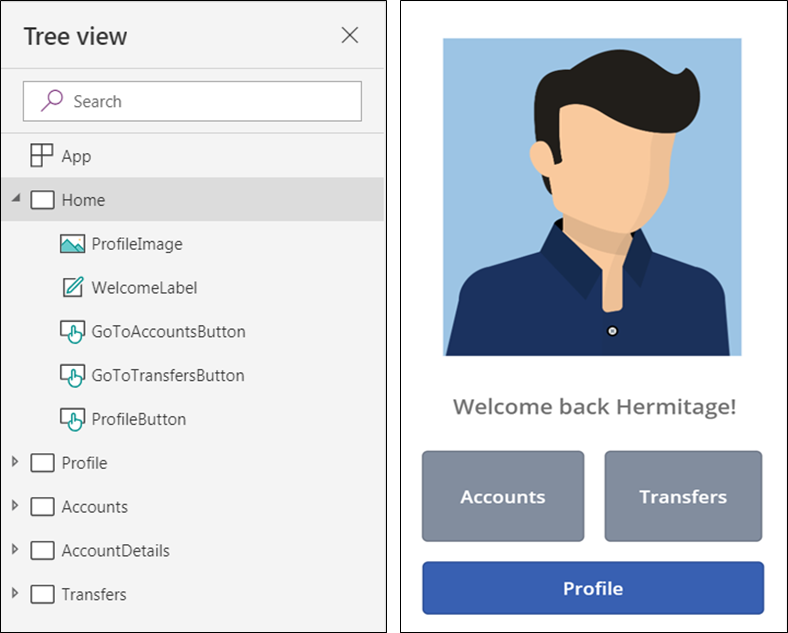
Home
Home (screen) is the first screen you will create in your client application. When you start the app, it will retrieve your profile information and put it in a collection called CustomerData.
| Property | Value |
|---|---|
OnVisible |
ClearCollect(CustomerData,ConsumerProfile.consumer()) |
ProfileImage
ProfileImage (image) will display the uploaded user image, it will also navigate to the Profile screen on select.
| Property | Value |
|---|---|
OnSelect |
Navigate(Profile, ScreenTransition.Fade) |
| Image | user |
WelcomeLabel
WelcomeLabel (label) will display a welcome message using the first name of the user.
| Property | Value |
|---|---|
| Text | Concatenate("Welcome back\ \",
CustomerProfileGallery.Selected.firstName,"!") |
Profile Screen
In the following sections, the formula separator character - the comma
,- may be different based on your regional and language settings. Find out more on the PowerApps Documentation, and update the formulas accordingly.
Profile
CustomerProfileGallery
Hidden in this screen, CustomerProfileGallery (gallery) will use the CustomerData collection to deal with nested schemas in the connectors responses.
| Property | Value |
|---|---|
| Items | CustomerData |
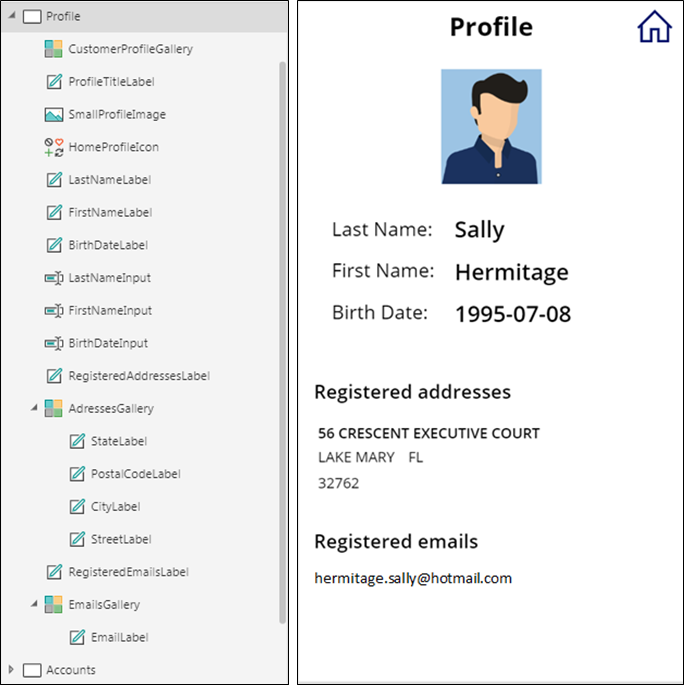
Profile
Profile is the screen with your personal data and contact information. When you access to it, it will create two galleries, addresses and emails.
| Property | Value |
|---|---|
OnVisible |
ClearCollect(addresses,CustomerProfileGallery.Selected.addresses);
ClearCollect(emails,CustomerProfileGallery.Selected.emails) |
ProfileTitleLabel
On the top of the screen there is ProfileTitleLabel (label) with the Profile title.
| Property | Value |
|---|---|
| Text | Profile |
SmallProfileImage
SmallProfileImage (image) contains a small version of the user image.
| Property | Value |
|---|---|
| Image | user |
HomeProfileIcon
At the top right HomeProfileIcon (icon) will let you navigate to the Home screen and
it will clear the customerData collection.
| Property | Value |
|---|---|
OnSelect |
Navigate(Home, ScreenTransition.Fade) |
LastNameLabel
| Property | Value |
|---|---|
| Text | Last Name: |
FirstNameLabel
| Property | Value |
|---|---|
| Text | First Name: |
BirthDateLabel
| Property | Value |
|---|---|
| Text | Birth Date: |
LastNameInput
| Property | Value |
|---|---|
| Default | CustomerProfileGallery.Selected.lastName |
FirstNameInput
| Property | Value |
|---|---|
| Default | CustomerProfileGallery.Selected.firstName |
BirthDateInput
| Property | Value |
|---|---|
| Default | CustomerProfileGallery.Selected.dateOfBirth |
RegisteredAddressesLabel
| Property | Value |
|---|---|
| Text | Registered addresses |
AdressesGallery
AdressesGallery will contain all the information of addresses.
| Property | Value |
|---|---|
| Items | addresses |
StateLabel
| Property | Value |
|---|---|
| Text | ThisItem.state |
PostalCodeLabel
| Property | Value |
|---|---|
| Text | ThisItem.postalCode |
CityLabel
| Property | Value |
|---|---|
| Text | ThisItem.city |
StreetLabel
| Property | Value |
|---|---|
| Text | ThisItem.streetLine_1 |
RegisteredEmailsLabel
At the bottom of the screen there is RegisteredEmailsLabel (label).
| Property | Value |
|---|---|
| Text | Registered emails |
EmailsGallery
EmailsGallery will contain the list of the email addresses.
| Property | Value |
|---|---|
| Items | emails |
EmailLabel
| Property | Value |
|---|---|
| Items | ThisItem.address |
Accounts Screen
In the following sections, the formula separator character - the comma
,- may be different based on your regional and language settings. Find out more on the PowerApps Documentation, and update the formulas accordingly.
Accounts
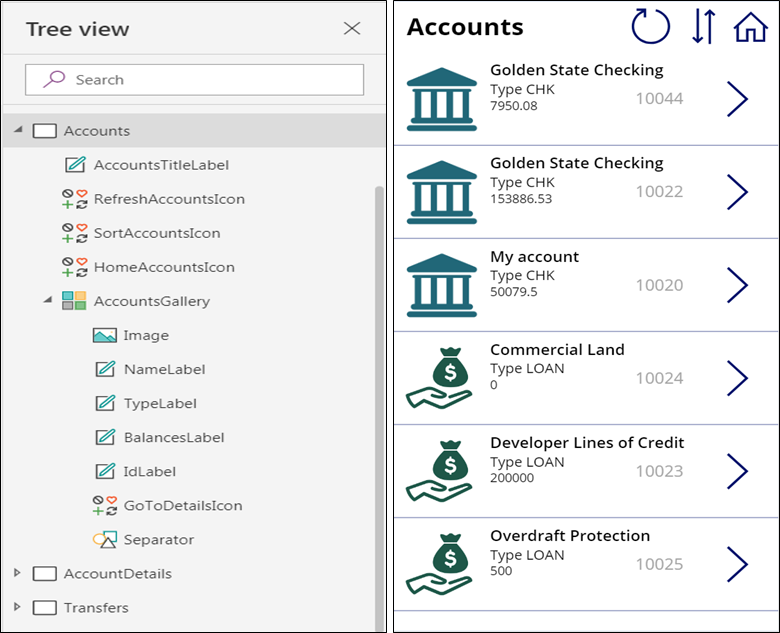
Accounts
Accounts is the screen with the list of the accounts, that will display the name, type, balance and id for each account.
When accessing this screen the SortAccounts variable is updated; this is used to organize the list of accounts.
| Property | Value |
|---|---|
OnVisible |
UpdateContext({SortAccounts:false}) |
AccountsTitleLabel
The main title of the screen is Accounts in AccountsTitleLabel (label).
| Property | Value |
|---|---|
| Text | Accounts |
RefreshAccountsIcon
RefreshAccountsIcon will get the list of accounts.
| Property | Value |
|---|---|
OnSelect |
Clear(AccountList);
Collect(AccountList,'Accounts(B2C)'.
extendedAccountsWithDetails()) |
SortAccountsIcon
SortAccountsIcon will sort the list of accounts
| Property | Value |
|---|---|
OnSelect |
UpdateContext({SortAccounts: !SortAccounts}) |
HomeAccountsIcon
HomeAccountsIcon will navigate to the Home screen.
| Property | Value |
|---|---|
OnSelect |
Navigate(Home, ScreenTransition.Fade); |
AccountsGallery
All the other elements of this screen are included in AccountsGallery (gallery). It will use
the AccountList collection.
| Property | Value |
|---|---|
| Items | SortByColumns(AccountList,"accountType",If(SortAccounts,
SortOrder.Descending,SortOrder.Ascending),"nickname",Ascending) |
Image
Image will display different images depending on the type of account, checking or loan.
| Property | Value |
|---|---|
| Image | If(ThisItem.accountType="CHK",check,loan) |
NameLabel
| Property | Value |
|---|---|
| Text | ThisItem.nickname |
TypeLabel
| Property | Value |
|---|---|
| Text | Concatenate("Type ",ThisItem.accountType) |
BalancesLabel
| Property | Value |
|---|---|
| Text | Last(FirstN(balances.amount, 1)).amount |
IdLabel
| Property | Value |
|---|---|
| Text | ThisItem.accountId |
GoToDetailsIcon
GoToDetailsIcon (icon) will get you to AccountDetails screen and will create the
Transactions collection with the detailed account information.
| Property | Value |
|---|---|
OnSelect |
Navigate(AccountDetails,ScreenTransition.Fade);
ClearCollect(Transactions,'Accounts(B2C)'.
transactions(ThisItem.accountId)) |
Separator
Separator will help your user visualize the list of accounts.
| Property | Value |
|---|---|
OnSelect |
Select(Parent) |
AccountDetails Screen
In the following sections, the formula separator character - the comma
,- may be different based on your regional and language settings. Find out more on the PowerApps Documentation, and update the formulas accordingly.
Accounts Details
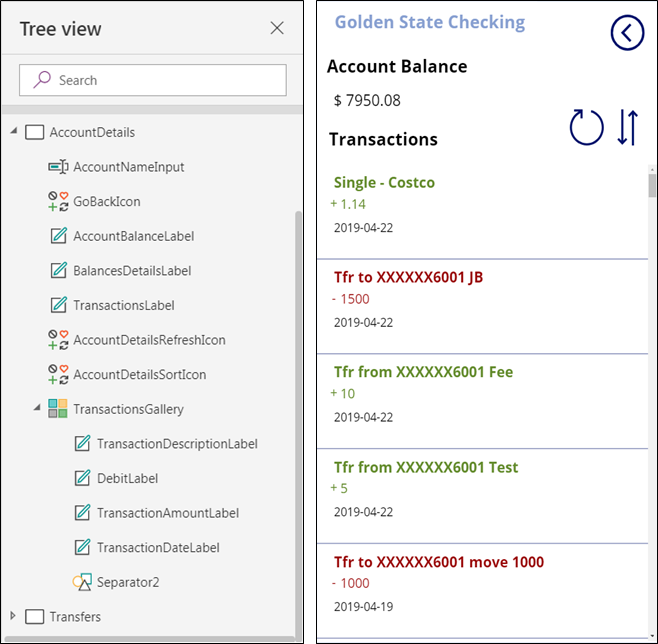
AccountDetails
The AccountDetails screen shows the current balance and the list of transactions of the selected account.
| Property | Value |
|---|---|
OnVisible |
UpdateContext({SortTransactions:false}) |
AccountNameInput
AccountNameInput(input) contains the name of the selected account in the Accounts screen.
| Property | Value |
|---|---|
| Default | NameLabel.Text |
GoBackIcon
To the right GoBackIcon (icon) will clear the Transactions collection and take you to the previous screen.
| Property | Value |
|---|---|
OnSelect |
Navigate(Accounts, ScreenTransition.Fade);Clear(Transactions) |
AccountBalanceLabel
| Property | Value |
|---|---|
| Text | Account Balance |
BalancesDetailsLabel
BalancesDetailsLabel label shows the balance of the account.
| Property | Value |
|---|---|
| Text | Concatenate("$ ", BalancesLabel.Text) |
TransactionsLabel
| Property | Value |
|---|---|
| Text | Transactions |
AccountDetailsRefreshIcon
AccountDetailsRefreshIcon (icon) will clear and recreate the Transactions collection.
| Property | Value |
|---|---|
OnSelect |
Clear(Transactions);
ClearCollect(Transactions,'Accounts(B2C)'.transactions(IdLabel)) |
AccountDetailsSortIcon
AccountDetailsSortIcon (icon) will update the SortTransactions variables used sort the transaction list.
| Property | Value |
|---|---|
OnSelect |
UpdateContext({SortTransactions: !SortTransactions}) |
TransactionsGallery
The list of transactions is displayed in TransactionsGallery (gallery) that uses the Transactions colletion.
| Property | Value |
|---|---|
| Items | SortByColumns(Transactions,"transactionDate",If(SortTransactions=
false,SortOrder.Descending,SortOrder.Ascending)) |
TransactionDescriptionLabel
| Property | Value |
|---|---|
| Text | ThisItem.description |
DebitLabel
| Property | Value |
|---|---|
| Text | If(ThisItem.debit=true,"-","+") |
TransactionAmountLabe
| Property | Value |
|---|---|
| Text | ThisItem.transactionAmount |
TransactionDateLabel
| Property | Value |
|---|---|
| Text | ThisItem.transactionDate |
Separator2
Separator2 will hep to visualize each element of the list.
| Property | Value |
|---|---|
OnSelect |
Select(Parent) |
Transfers Screen
In the following sections, the formula separator character - the comma
,- may be different based on your regional and language settings. Find out more on the PowerApps Documentation, and update the formulas accordingly.
Transfers screen contains all the elements to make an internal transfer.
Transfers
InternalTransferLabel
InternalTransferLabel (label) shows the Internal Transfers title
| Property | Value |
|---|---|
| Text | Internal Transfers |
HomeTransferIcon
HomeTransferIcon (icon) will take you back to the Home screen and clear the AccountList collection.
| Property | Value |
|---|---|
OnSelect |
Navigate(Home, ScreenTransition.Fade); Clear(AccountList) |
FromAccountLabel
| Property | Value |
|---|---|
| Text | From account |
FromAccountList
| Property | Value |
|---|---|
| Items | Filter(AccountList,accountType="CHK").accountSelection |
ToAccountLabel
| Property | Value |
|---|---|
| Text | To account |
ToAccountList
| Property | Value |
|---|---|
| Items | Filter(AccountList,accountType="CHK").accountSelection |
AmountLabel
| Property | Value |
|---|---|
| Text | Amount |
TransferAmountInput
TransferAmountInput (input) accepts Number.
| Property | Value |
|---|---|
| Default | 0 |
DescriptionLabel
| Property | Value |
|---|---|
| Text | Description |
TransferDescriptionInput
TransferDescriptionInput (input) accepts Text.
| Property | Value |
|---|---|
| Default | "" |
CheckIcon
CheckIcon (icon) will show a check or cancel symbol depending on the status of the transfer.
| Property | Value |
|---|---|
| Visible | ShowImage |
| Icon | If(IsBlank(responseConfirmation),Icon.Cancel,Icon.Check) |
TransferTimer
TransferTimer (timer) is hidden and indicates how much time CheckIcon is shown.
| Property | Value |
|---|---|
| Duration | 5000 |
| AutoStart | ShowImage |
OnTimerEnd |
UpdateContext({ShowImage: false}) |
Run your Client Application
Test your Client Application in PowerApps Studio
You are now ready to test your client application. Click the Preview icon from the canvas toolbar, or press F5. You can now test all the features and connections of the client application.
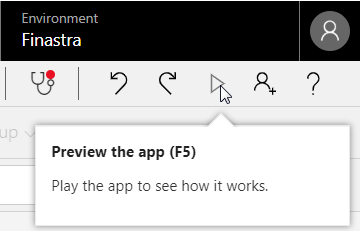
Preview the client application
Save your Client Application
To share and publish your client application you first need to save it, go to File and click Save.
Publish your Client Application
When you save your client application, you enable the Publish button. Click it to publish your client application.

Publish your client application
Import and Export Your Client Application
In environments, under the Apps section, you can import and export your client application.
The export action will generate a ZIP file containing the client application and the references to its custom connectors.
The custom connectors cannot be exported, therefore you need to define them first before importing this client application to a new one.
To import a client application that you previously saved
- Go to the Apps sections in PowerApps and select Import package.
- Upload your ZIP file that you previously exported.
- (Optional) Alternatively, download and use the following archive - package.zip , if you want to skip the PowerApps app creation process.
- In the Related resources section, select your custom connectors by matching the names.
- You can change the name of the client application using the ACTION option, click in Import to finalize.