SPI Application Tutorial
The purpose of the sample project is to illustrate the SPI Implementation Workflow and to show you:
- How to implement the Sample SPI in your client application based on its OpenAPI specification, with the Spring Boot Java framework.
- How to test the SPI implementation using Postman, a popular HTTP client.
Get it from GitHub
For your convenience, this sample SPI client application is available on GitHub, in the following repository: https://github.com/fusionfabric/ffdc-sample-spi.
Clone it and follow the instructions from the README.md file.
Prerequisites
To build this client app you need a recent Java installation on your machine and the OpenAPI specification of the Sample SPI, that you download from the reference documentation page.
To test the implementation you need to have Postman installed on your machine.
You must also register an application on FusionCreator that includes the Sample SPI.
Bootstrap App
In this section, you will use a web service called Spring Initializr to prepare a Spring Boot project.
To bootstrap your application
- Go to https://start.spring.io/ to use Spring Initializr.
- Enter the Project Metadata, as follows:
- Group: the group ID, such as
com.finastra - Artifact: the artifact ID, which is your application name, such as:
sampleSPI
- Group: the group ID, such as
- Add the following dependencies:
- WEB related
- REST Repositories
- Spring Web
- DEVTOOLS related
- Spring Configuration Processor
- SECURITY related
- Spring Security
- OAuth2 Resource Server
- WEB related
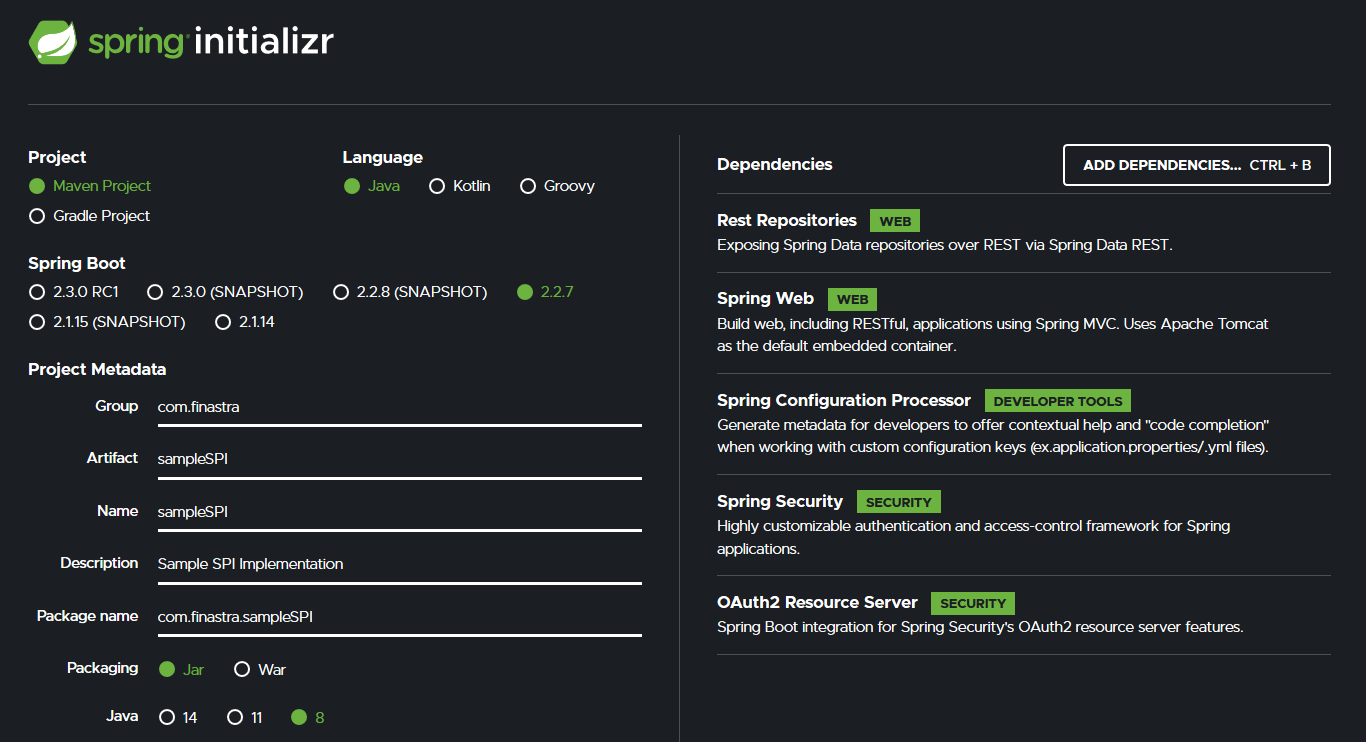
Bootstrap your sample SPI client app with Spring Intializr
- Click Generate. A ZIP archive, with the name of your artifact, is ready for you to download.
- Unpack the downloaded archive, and open the project directory.
- Open pom.xml and add another set of dependencies from Maven repository, apart from those already added by Spring Initializr. Save the file after you edit it.
...
<dependencies>

<!-- dependencies added by Spring Initializr -->

 <dependency>
		<groupId>org.springframework.boot</groupId>
		<artifactId>spring-boot-starter-data-rest</artifactId>
	</dependency>
	<dependency>
		<groupId>org.springframework.boot</groupId>
		<artifactId>spring-boot-starter-oauth2-resource-server</artifactId>
	</dependency>
	<dependency>
		<groupId>org.springframework.boot</groupId>
		<artifactId>spring-boot-starter-security</artifactId>
	</dependency>
	<dependency>
		<groupId>org.springframework.boot</groupId>
		<artifactId>spring-boot-starter-web</artifactId>
	</dependency>
	<dependency>
		<groupId>org.springframework.boot</groupId>
		<artifactId>spring-boot-configuration-processor</artifactId>
		<optional>true</optional>
	</dependency>
	<dependency>
		<groupId>org.springframework.boot</groupId>
		<artifactId>spring-boot-starter-test</artifactId>
		<scope>test</scope>
		<exclusions>
			<exclusion>
				<groupId>org.junit.vintage</groupId>
				<artifactId>junit-vintage-engine</artifactId>
			</exclusion>
		</exclusions>
	</dependency>
	<dependency>
		<groupId>org.springframework.security</groupId>
		<artifactId>spring-security-test</artifactId>
		<scope>test</scope>
	</dependency>

<!-- dependencies added from Maven repository -->

 <dependency>
    <groupId>com.auth0</groupId>
    <artifactId>java-jwt</artifactId>
    <version>3.8.3</version>
 </dependency>
 <dependency>
    <groupId>com.auth0</groupId>
    <artifactId>jwks-rsa</artifactId>
    <version>0.11.0</version>
 </dependency>
 <dependency>
    <groupId>org.springframework.security.oauth.boot</groupId>
    <artifactId>spring-security-oauth2-autoconfigure</artifactId>
    <version>2.2.6.RELEASE</version>
 </dependency>


</dependencies>

...
Open a terminal, or a command prompt and run the Maven install command as follows:
- if you have Maven installed on your computer:
mvn install- if you don’t have Maven:
mvnw installThe required dependencies are downloaded and added to your project.
Import the project in your favorite IDE.
You are now ready to code your Sample SPI application.
You implement a resource server that complies with the SPI specification. Your server will return the day of the week as a response.
You will create 3 packages:
- controller package - which stores standard front controllers in the typical Spring MVC architecture
- security package - which stores the OAuth2 authentication related classes
- error package - which stores objects related to error handling
SPI Controller
To implement the controller package
- Create a package named controller.
- Under controller package, create a new package named entity, which stores objects related to the operation outputs/inputs from controller
- In entity package, create the DayOfTheWeekResponse class - which defines the format of the response body - with the following code
package com.finastra.sampleSPI.controller.entity;

public class DayOfTheWeekResponse {
    private String date;
    private String dayOfWeek;

    public DayOfTheWeekResponse(String date) {
        DateTimeFormatter formatters = DateTimeFormatter.ofPattern("yyyy-MM-dd");
        LocalDate localDate = LocalDate.parse(date, formatters);
        DayOfWeek dayOfWeek = DayOfWeek.from(localDate);
        this.date = date;
        this.dayOfWeek = dayOfWeek.toString();
    }

    @Override
    public String toString() {
        return "{" +
                "date= \"" + date + '\"' +
                ", dayOfWeek=\"" + dayOfWeek + '\"' +
                '}';
    }

    public String getDate() {
        return date;
    }

    public void setDate(String date) {
        this.date = date;
    }

    public String getDayOfWeek() {
        return dayOfWeek;
    }

    public void setDayOfWeek(String dayOfWeek) {
        this.dayOfWeek = dayOfWeek;
    }

}- Import the required libraries for DayOfTheWeekResponse.
import java.time.DayOfWeek;
import java.time.LocalDate;
import java.time.format.DateTimeFormatter;- In controller package, create the DayOfTheWeekController class. This is the standard Spring controller with a single endpoint enabling POST operations at the
/day-of-weekendpoint.
package com.finastra.sampleSPI.controller;

@Controller
public class DayOfTheWeekController {

    Logger logger = LoggerFactory.getLogger(DayOfTheWeekController.class);

    @PostMapping("/day-of-week")
    @ResponseBody
    public ResponseEntity<Object> getDayOfWeek(@RequestBody Map<String, String> inputDate) {
        return new ResponseEntity<>(new DayOfTheWeekResponse(inputDate.get("date")), HttpStatus.OK);
    }
}- Import the required libraries for DayOfTheWeekController class, and the references to the previously created class.
import com.finastra.sampleSPI.controller.entity.DayOfTheWeekResponse;

import org.slf4j.Logger;
import org.slf4j.LoggerFactory;
import org.springframework.http.HttpStatus;
import org.springframework.http.ResponseEntity;
import org.springframework.stereotype.Controller;
import org.springframework.web.bind.annotation.*;

import java.util.Map;
Security
To implement the security package
- Create a package named security.
- In the security package, create 3 classes:
- AudienceValidator - to verify the presence of
audclaim claim in the JWT token - SignatureValidator - to validate the token signature and expiration
- SecurityConfig - the standard security configuration class
- Write the following code for the AudienceValidator.
package com.finastra.sampleSPI.security;

class AudienceValidator implements OAuth2TokenValidator<Jwt> {
    private final String audience;

    AudienceValidator(String audience) {
        this.audience = audience;
    }

    public OAuth2TokenValidatorResult validate(Jwt jwt) {

        OAuth2Error error = new OAuth2Error("invalid_token", "The required audience is missing", null);

        if (jwt.getAudience().contains(audience)) {
            return OAuth2TokenValidatorResult.success();
        }

        return OAuth2TokenValidatorResult.failure(error);
    }
}- Import the required libraries for AudienceValidator.
import com.finastra.sampleSPI.controller.DayOfTheWeekController;

import org.slf4j.Logger;
import org.slf4j.LoggerFactory;
import org.springframework.security.oauth2.core.OAuth2Error;
import org.springframework.security.oauth2.core.OAuth2TokenValidator;
import org.springframework.security.oauth2.core.OAuth2TokenValidatorResult;
import org.springframework.security.oauth2.jwt.Jwt;- Write the following code for the SignatureValidator class.
package com.finastra.sampleSPI.security;

class SignatureValidator implements OAuth2TokenValidator<Jwt> {

    private final String issuer;
    private final String WELL_KNOWN_JWKS_PATH = "oidc/jwks.json";

    Logger logger = LoggerFactory.getLogger(DayOfTheWeekController.class);

    public SignatureValidator(String issuer) {
        this.issuer = issuer;
    }

    public OAuth2TokenValidatorResult validate(Jwt jwt) {

        try {
            Jwk jwk = null;
            JwkProvider provider = new UrlJwkProvider(new URL(issuer + "/" +  WELL_KNOWN_JWKS_PATH));
            DecodedJWT jwtDecoded = JWT.decode(jwt.getTokenValue());
            jwk = provider.get(jwtDecoded.getKeyId());
            Algorithm algorithm = Algorithm.RSA256((RSAPublicKey) jwk.getPublicKey(), null);
            algorithm.verify(jwtDecoded);
            return OAuth2TokenValidatorResult.success();
        } catch (JwkException jwkE) {
            logger.error("Could not validate signature: " + jwkE.getMessage());
        } catch (MalformedURLException e) {
            throw new RuntimeException("Problem with retrieving jwks.json file");
        }

        OAuth2Error error = new OAuth2Error("invalid_token", "The required audience is missing", null);

        // Check expiration
        if (jwt.getExpiresAt().isBefore(Instant.now())){
            throw new RuntimeException("Expired token!");
        }

        return OAuth2TokenValidatorResult.failure(error);
    }
}- Import the required libraries for the SignatureValidator class.
import com.finastra.sampleSPI.controller.DayOfTheWeekController;

import com.auth0.jwk.*;
import com.auth0.jwt.JWT;
import com.auth0.jwt.algorithms.Algorithm;
import com.auth0.jwt.interfaces.DecodedJWT;
import org.slf4j.Logger;
import org.slf4j.LoggerFactory;
import org.springframework.security.oauth2.core.OAuth2Error;
import org.springframework.security.oauth2.core.OAuth2TokenValidator;
import org.springframework.security.oauth2.core.OAuth2TokenValidatorResult;
import org.springframework.security.oauth2.jwt.Jwt;

import java.net.MalformedURLException;
import java.net.URL;
import java.security.interfaces.RSAPublicKey;
import java.time.Instant;- Write the following code for the SecurityConfig class.
package com.finastra.sampleSPI.security;

@EnableWebSecurity
public class SecurityConfig extends WebSecurityConfigurerAdapter {

    private static final String audience = "sample-spi-v1-0504c686-15d4-4002-bc11-8c1791807fa4";

    @Value("${spring.security.oauth2.resourceserver.jwt.issuer-uri}")
    private String issuer;

    @Override
    public void configure(HttpSecurity http) throws Exception {
        http.authorizeRequests()
                .mvcMatchers("/").authenticated()
                .and()
                .oauth2ResourceServer().jwt();
    }

    @Bean
    JwtDecoder jwtDecoder() {
        NimbusJwtDecoder jwtDecoder = (NimbusJwtDecoder)
                JwtDecoders.fromOidcIssuerLocation(issuer);

        OAuth2TokenValidator<Jwt> audienceValidator = new AudienceValidator(audience);
        OAuth2TokenValidator<Jwt> signatureValidator = new SignatureValidator(issuer);
        OAuth2TokenValidator<Jwt> withIssuer = JwtValidators.createDefaultWithIssuer(issuer);
        OAuth2TokenValidator<Jwt> withAudience = new DelegatingOAuth2TokenValidator<>(withIssuer, audienceValidator, signatureValidator);

        jwtDecoder.setJwtValidator(withAudience);

        return jwtDecoder;
    }
}- Import the required libraries for the SecurityConfig class.
import org.springframework.beans.factory.annotation.Value;
import org.springframework.context.annotation.Bean;
import org.springframework.http.HttpMethod;
import org.springframework.security.config.annotation.web.builders.HttpSecurity;
import org.springframework.security.config.annotation.web.configuration.EnableWebSecurity;
import org.springframework.security.config.annotation.web.configuration.WebSecurityConfigurerAdapter;
import org.springframework.security.oauth2.core.DelegatingOAuth2TokenValidator;
import org.springframework.security.oauth2.core.OAuth2TokenValidator;
import org.springframework.security.oauth2.jwt.*;
Error Handling
To implement the error package
- Create a package named error under src/main/java/com.finastra.sampleSPI project folder.
- In error package, create 2 classes:
- Error.java - which stores error objects
- Handler.java - which stores an error handler used to detect different type of objects
- Write the following code for the Error.java
package com.finastra.sampleSPI.error;

public class Error {

    private String message;

    public Error(String message) {
        this.message = message;
    }

    public String getMessage() {
        return message;
    }

    public void setMessage(String message) {
        this.message = message;
    }
}- Write the following code for the Handler class.
package com.finastra.sampleSPI.error;

@ControllerAdvice
public class Handler {


    @ExceptionHandler(Exception.class)
    @ResponseBody
    public ResponseEntity<Object> handle(Exception ex, HttpServletRequest request, HttpServletResponse response) {

        if(ex instanceof DateTimeParseException){
            return new ResponseEntity<>(new Error("Invalid data format. Correct data format yyyy-MM-dd"), HttpStatus.BAD_REQUEST);
        }

        if (ex instanceof NullPointerException) {
            return new ResponseEntity<>(new Error("Mandatory parameter \"date\" is missing"), HttpStatus.BAD_REQUEST);
        }

        return ResponseEntity.status(HttpStatus.INTERNAL_SERVER_ERROR).build();
    }
}- Import the required libraries for the Handler class.
import org.springframework.http.HttpStatus;
import org.springframework.http.ResponseEntity;
import org.springframework.web.bind.annotation.ControllerAdvice;
import org.springframework.web.bind.annotation.ExceptionHandler;
import org.springframework.web.bind.annotation.ResponseBody;

import javax.servlet.http.HttpServletRequest;
import javax.servlet.http.HttpServletResponse;
import java.time.format.DateTimeParseException;
Application Properties
You configure the the application properties, such as the server port, context path and the issuer endpoint.
To configure the application properties
- In /src/main/resources open the application.properties file, created by default
- Add the following content:
server.port=9000
server.servlet.context-path=/sample/spi/v1
spring.security.oauth2.resourceserver.jwt.issuer-uri=https://api.fusionfabric.cloud/login/v1
Set Up Postman
You set up the environment and the collection files for Postman test and validation mechanism.
To set up the Postman environment
- Create a directory named postman under sampleSPI module folder
- Under postman directory, create a new directory named env
- In env folder, create the sampleSPI.postman_environment JSON file with the following code
{
	"id": "ed65d02b-6840-41ae-84fc-eb979df9ae32",
	"name": "sample-spi",
	"values": [
		{
			"key": "APIM",
			"value": "https://api.fusionfabric.cloud",
			"enabled": true
		},
		{
			"key": "sample-spi-url",
			"value": "YOUR_URL",
			"enabled": true
		},
		{
			"key": "client_id",
			"value": "",
			"enabled": true
		},
		{
			"key": "client_secret",
			"value": "",
			"enabled": true
		},
		{
			"key": "tenant",
			"value": "sandbox",
			"enabled": true
		}
	],
	"_postman_variable_scope": "environment",
	"_postman_exported_at": "2020-03-17T07:32:30.324Z",
	"_postman_exported_using": "Postman/7.20.1"
}- Download the Sample SPI Postman Collection from the Actions menu on the SPI reference documentation page. Copy the collection to the postman directory in your project.
Run your App
Your are now ready to run your client app.
To run your app
If you have Maven installed on your machine, start your app with:
$ mvn spring-boot:run
Otherwise, with:
$ mvnw spring-boot:run
Test the SPI Implementation with Postman
Open Postman and import the previously created environment and collection files.
To test the SPI implementation in your client application
- Select the sample-spi environment file from the top-right drop-down menu, and click the Settings icon to edit the environment variables
- Edit the environment variables:
sample-spi-url: replaceYOUR_URLwithhttp://localhost:9000client_id: enter the client ID from your FusionCreator applicationclient_secret: enter the secret key you generated for this application
- Update the values in the environment
- Expand the Sample SPI collection
- Select the POST APIM fetch token endpoint
- Select Oauth2 - Client Credentials in Authorization tab to get an access token for the endpoint call.
- Use the same
Client IDandClient Secretas for the environment. - Use the
Access Token URLfound in the Sample SPI reference documentation. - Request the token and use it.
- Make the call to the POST APIM fetch token endpoint. This will request the access token and store it in the
APIM_tokenenvironment variable. - Select the POST Call sample-spi with token endpoint and make the call. You can see the response body returning the day of the week for the date you enter in the POST request body.
Both POST Call sample-spi methods reference the same endpoint. The difference between them is:
- The with token one uses the access token stored in the
APIM_tokenenvironment variable, and you receive a200response when you call it.- The without token one does not store the access token in the
APIM_tokenenvironment variable, and although you reach the target, you receive a403 Forbiddenresponse, which is the expected response.